对LLVM Tutorial Toy前五章做了一个总结, 侧重Codegen部分.
Kaleidoscope支持的语法 #
表达式运算:
4+5;
5-1;
5*10;
10/5;
函数定义:
def bar(a) foo(a, 4.0) + bar(31337);
函数调用:
cos(1.234);
if/then/else:
extern foo();
extern bar();
def baz(x) if x then foo() else bar();
for:
extern putchard(char);
def printstar(n)
  for i = 1, i < n, 1.0 in
    putchard(42);  # ascii 42 = '*'

# print 100 '*' characters
printstar(100);
词法分析 #
词法分析很简单. 我这里简单画了下处理的流程图.
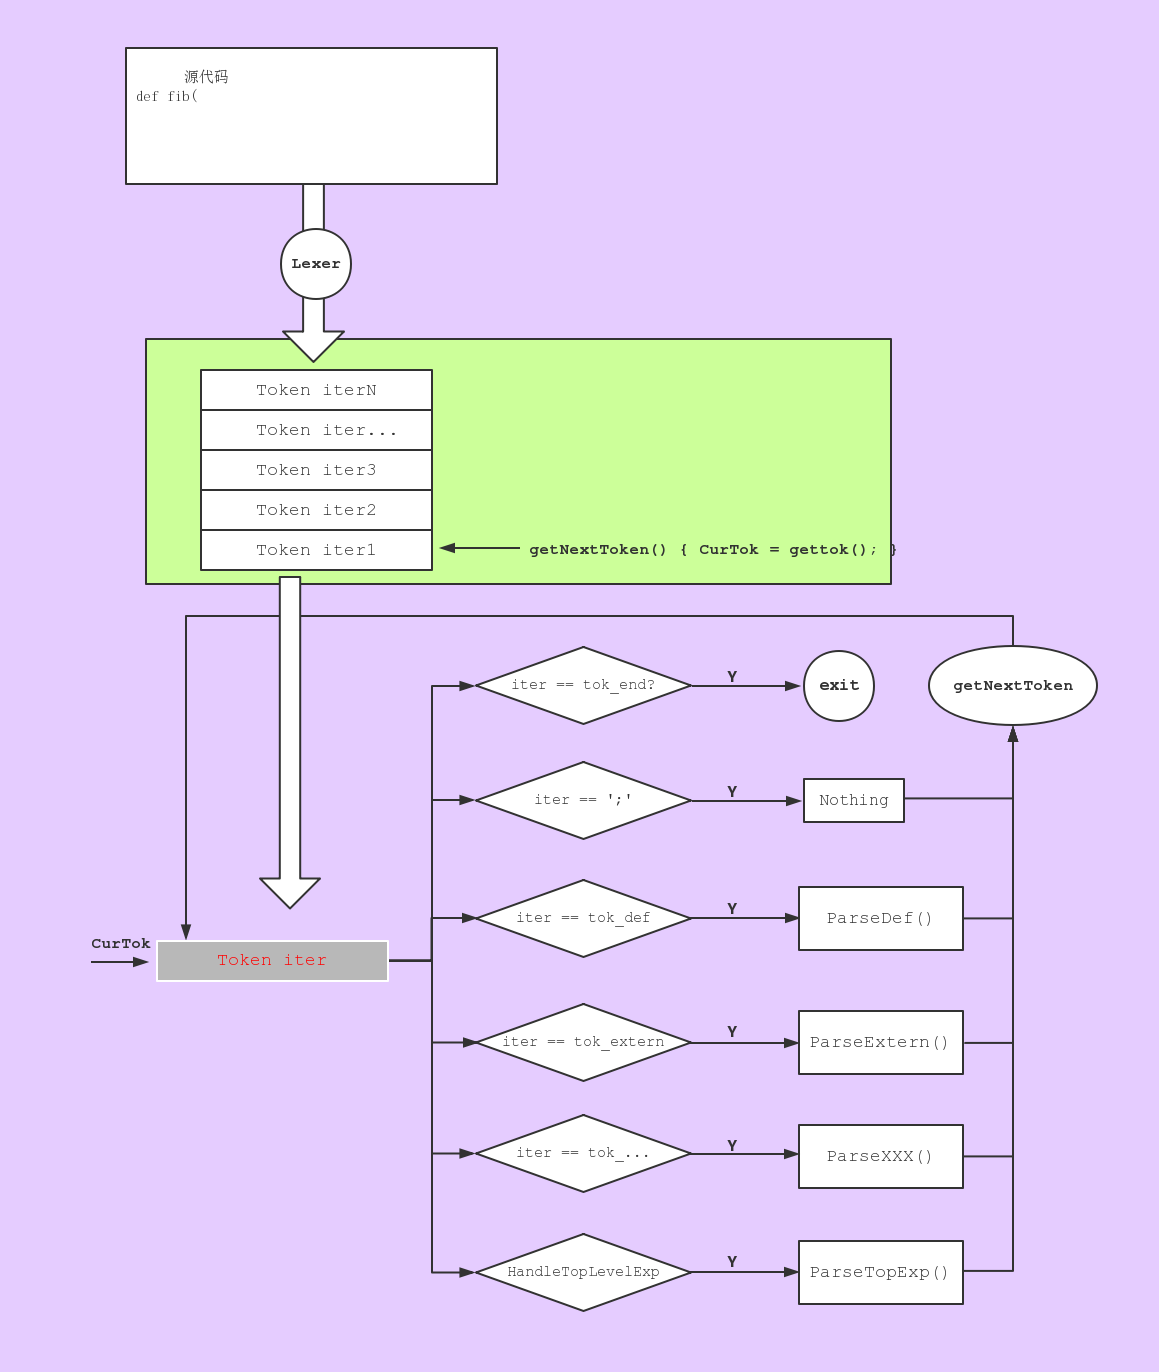
具体的分析请看: Lexer and Parse
抽象语法树 #
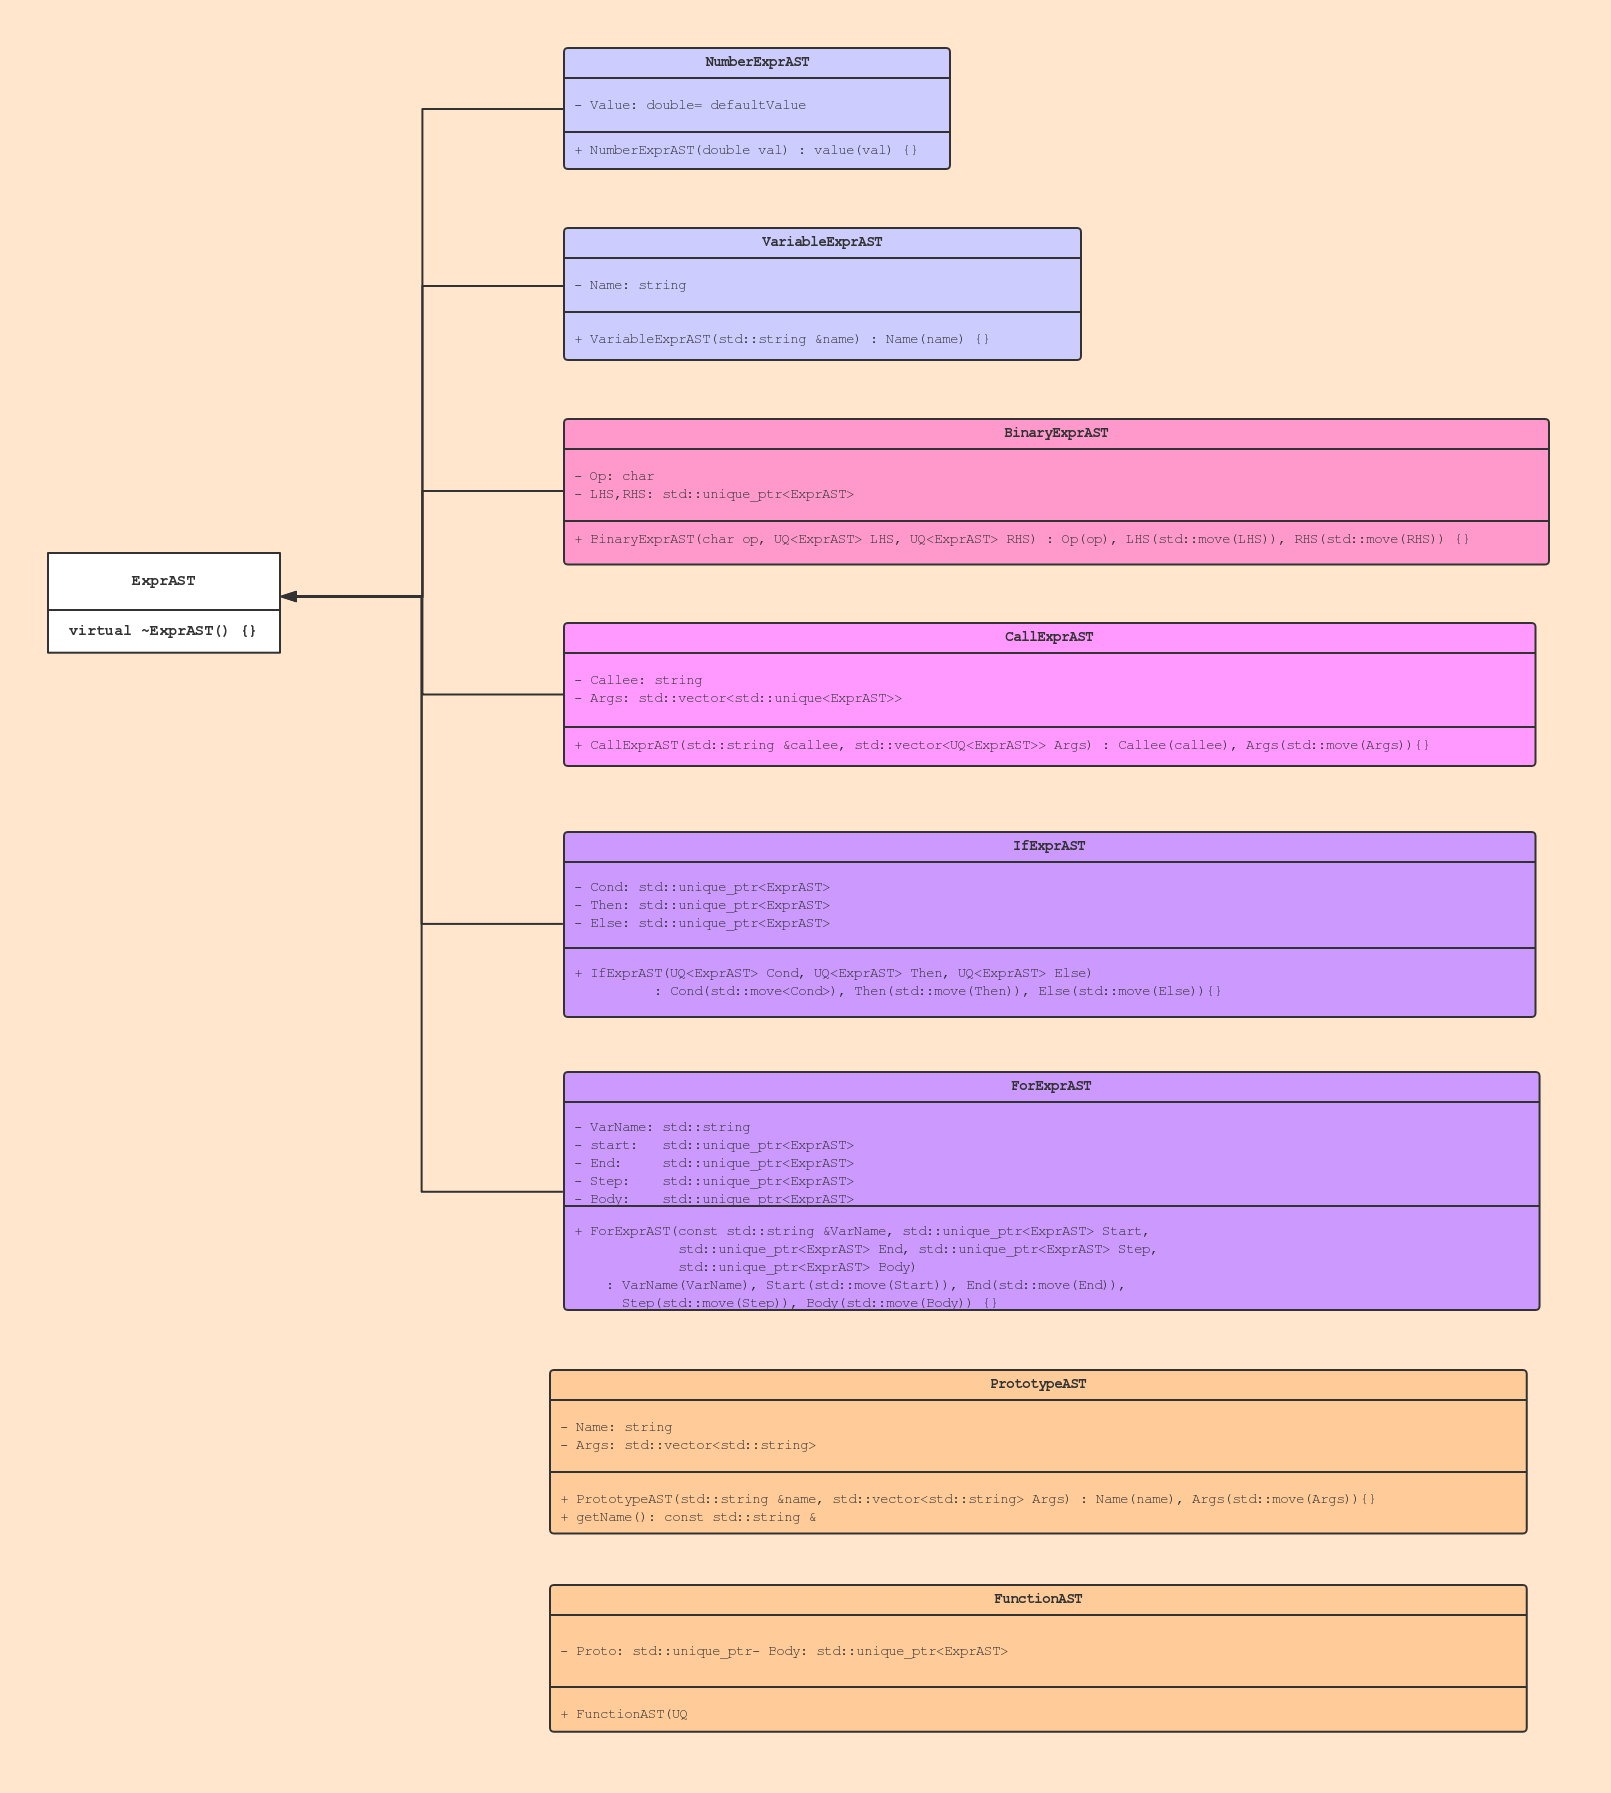
生成抽象语法树(AST) #
这块比较简单. 简单介绍下:
Expr的(AST)生成 #
我们对所有的表达式进行集中处理.
/// expression
///   ::= primary binoprhs
///
static std::unique_ptr<ExprAST> ParseExpression() {
  auto LHS = ParsePrimary();
  if (!LHS)
    return nullptr;

  return ParseBinOpRHS(0, std::move(LHS));
}

static std::unique_ptr<ExprAST> ParsePrimary() {
  switch (CurTok) {
  default:
    return LogError("unknown token when expecting an expression");
  case tok_identifier:
    return ParseIdentifierExpr();
  case tok_number:
    return ParseNumberExpr();
  case '(':
    return ParseParenExpr();
  case tok_if:
    return ParseIfExpr();
  case tok_for:
    return ParseForExpr();
  }
}
ParseIdentifierExpr,ParseNumberExpr和ParseParenExpr的实现请参考:
Implementing a Parser and AST.
ParseIfExpr和ParseForExpr的实现请参考:
Extending the Language Control Flow.
函数定义和申明的AST生成 #
请参考: Implementing a Parser and AST
Codegen(产生LLVM IR) #

四个基本表达式的codegen #
请参考: code generation to llvm ir
if/then/else #
Kaleidoscpe: if/then/else #
extern foo();
extern bar();
def baz(x) if x then foo() else bar();  // 如果 x != 0, then foo, else bar;
未经优化的LLVM IR #
根据我们上面编写的Kaleidoscope的代码, 可以生成下面的LLVM IR.
declare double @foo()

declare double @bar()

define double @baz(double %x) {
entry:
  %ifcond = fcmp one double %x, 0.000000e+00
  br i1 %ifcond, label %then, label %else

then:       ; preds = %entry
  %calltmp = call double @foo()
  br label %ifcont

else:       ; preds = %entry
  %calltmp1 = call double @bar()
  br label %ifcont

ifcont:     ; preds = %else, %then
  %iftmp = phi double [ %calltmp, %then ], [ %calltmp1, %else ] ; 返回值
  ret double %iftmp
}
IR解析 #
| IR指令 | 例子 | 作用 |
|---|---|---|
| \(\bold{fcmp}\) | \(\color{red}{fcmp}\ \color{black}{one}\ \color{black}{double}\ \color{black}{x}\ \color{black}{0.0e+00}\ \) | 比较指令, 相等则返回 0, 不相等返回 1 |
| \(\bold{call}\) | \(\color{red}{call}\ \color{black}{double}\ \color{black}{@ foo()} \) | 调用函数 |
| \(\bold{br}\) | \(\color{red}{br}\ \color{black}{\{label\}}\ \color{black}{\{\%ifcont\}} \) | 直接跳转 |
| \(\bold{br}\) | \(\color{red}{br}\enspace\color{black}{i1\enspace \%ifcond, label \enspace then, label\enspace \%else}\) | 条件跳转 |
| \(\bold{phi}\) | \(\color{red}{phi}\enspace \color{black}{double [ \% calltmp, \%then], [\%calltmp1, \%else]}\) | 调用${phi}$ 函数 |
| \(\bold{ret}\) | \(\color{red}{ret}\enspace \color{black}{double\enspace \% 0}\) | 函数返回 |
| Label | means |
|---|---|
| \(\bold{entry}\) | 函数入口 |
| \(\bold{then}\) | 条件分支then |
| \(\bold{else}\) | 条件分支else |
| \(\bold{ifcont}\) | 结束条件分支 |
if/then/else’s CFG #
使用opt -analyze -view-cfg if.bc生成的CFG.

if/then/else’s dominator (判断哪里需要插入phi函数) #
这里只是对插入$\phi$函数时机的一个分析. (不想了解的壳跳过).
根据我前面翻译的文章:
Dominator来分析我们if/then/else的控制流.
我们将: entry 视为节点
\(\bold{1}\)
。 then视为节点
\(\bold{2}\)
。
else 视为节点
\(\bold{3}\)
。 ifcont视为节点
\(\bold{4}\)
。
| 1 | dom | \(\color{Gray}{1}\) | \(\color{Red}{2}\) | \(\color{Red}{3}\) | 4 |
|---|---|---|---|---|---|
| 2 | dom | \(\color{Gray}{2}\) | |||
| 3 | dom | \(\color{Gray}{3}\) | |||
| 4 | dom | \(\color{Gray}{4}\) |
| 节点 | 支配分析 |
|---|---|
| 1 | 支配: 1, 2, 3, 4. 严格支配: 2, 3, 4. 直接支配: 2, 3. 支配边界: set(). |
| 2 | 支配: 2. 严格支配: 无. 直接支配: 无. 支配边界: set(4). |
| 3 | 支配: 3. 严格支配: 无. 直接支配: 无. 支配边界: set(4). |
| 4 | 支配: 4. 严格支配: 无. 直接支配: 无. 支配边界: set(). |
根据 SSA理论, 我们可以在 4 节点处插入 \(\bold{phi}\) 函数.
Builder创建IR指令 #
用Builder来产生每条指令的IR.
下面是一些if/then/else会涉及到的Builder创建指令的操作。
创建cmp指令 #
CondV = Builder.CreateFCmpONE(
      CondV, ConstantFP::get(TheContext, APFloat(0.0)), "ifcond");
创建条件br指令 #
Builder.CreateCondBr(CondV, ThenBB, ElseBB);
创建直接br指令 #
Builder.CreateBr(MergeBB);
创建phi指令 #
  PHINode *PN =
    Builder.CreatePHI(Type::getDoubleTy(TheContext), 2, "iftmp");

  PN->addIncoming(ThenV, ThenBB);
  PN->addIncoming(ElseV, ElseBB);
  return PN;
创建Block #
- 构造block时直接在"TheFunction"后面添加该block.
BasicBlock *ThenBB =
    BasicBlock::Create(TheContext, "then", TheFunction);
-
单纯创建Block, 当未添加到函数中.
BasicBlock *ElseBB = BasicBlock::Create(TheContext, "else");
IRBuilder中插入Block #
控制流的独特性之处在于, 它有自己的内部的作用域(block). 所以我们在编写codegen代码时, 会调用内部block的codegen. 而不会直接去处理它.(内部block的codegen是它自己处理的, 不归我们的 ifExpr.Codegen管)
所以我们会这样做:
Builder.SetInsertPoint(ThenBB);          // 将builder此时的插入点设置为ThenBB.
Value *ThenV = Then->codegen();          // 调用 then block的codegen
将未添加的Block添加到函数中 #
在"TheFunction"后面添加"merge block", 因为在我们创建时, 只是单纯的创建的block, 还未添加到函数中.
  TheFunction->getBasicBlockList().push_back(MergeBB); // TheFunction中添加Block
  Builder.SetInsertPoint(MergeBB); // IRBuilder中插入BB
Builder流程图 #
生成if/then/else 的IR可以分为四个部分生成:
- cond
- 创建cmp IR. 目的是根据条件判断返回bool值.
- 创建条件跳转IR. 目的是根据返回的bool值做分支跳转.
- then
- then.codegen(). 目的是进行then block的codegen.
- 创建直接跳转IR.目的是跳转到ifcond处.
- else
- else.codegen(). 目的是进行else block的codegen.
- 创建直接跳转IR,目的是跳转到ifcond处.
- ifcond(分支合并后):
- 创建phi函数调用IR. 目的是判断我们是从哪个分支跳转来的.
注意, 这里不会涉及ret指令的codegen ,我们在ifExprAST中最后做的仅仅是将$\bold{\phi}$函数的返回值返回. ret指令的codegen应该在函数的codegen时做.
(在上文例子中, ret指令的codegen 是baz函数生成的)
graph TD Start("If Codegen") builderCreateCmp["Builder.CreateCmpOne"] builderCreateCond["Builder.CreateCondBr"] Start --> builderCreateCmp builderCreateCmp --> builderCreateCond subgraph Then builderSetInsertThenBB["Builder.SetInsertPoint(ThenBB);"] ThenCodegen["Then->codegen();"] builderCreateBr1["Builder.CreateBr"] builderSetInsertThenBB --> ThenCodegen ThenCodegen --> builderCreateBr1 end builderCreateCond --> builderSetInsertThenBB subgraph Else builderSetInsertElseBB["Builder.SetInsertPoint(ElseBB);"] ElseCodegen["Else->codegen();"] builderCreateBr2["Builder.CreateBr"] builderSetInsertElseBB --> ElseCodegen ElseCodegen --> builderCreateBr2 end builderCreateBr1 --> builderSetInsertElseBB subgraph Merge builderSetInsertIfContBB["builder.SetInsertPoint(MergeBB);"] builderCreatePHI["Builder.CreatePHI"] builderSetInsertIfContBB --> builderCreatePHI end builderCreateBr2 --> builderSetInsertIfContBB builderCreatePHI --> End("End Codegen") style builderSetInsertThenBB fill:#ffcc66 style builderSetInsertElseBB fill:#ffcc66 style builderSetInsertIfContBB fill:#ffcc66 style ThenCodegen fill:#ff66cc style ElseCodegen fill:#ff66cc style Start fill:#ff9966 style End fill:#ff9966
Loop #
Kaleidoscope: for #
extern putchard(char);
def printstar(n)
  for i = 1, i < n, 1.0 in
    putchard(42);  # ascii 42 = '*'

# print 100 '*' characters
printstar(100);
未经优化的LLVM IR #
declare double @putchard(double)

define double @printstar(double %n) {
entry:
  ; initial value = 1.0 (inlined into phi)
  br label %loop

loop:       ; preds = %loop, %entry
  %i = phi double [ 1.000000e+00, %entry ], [ %nextvar, %loop ]
  ; body
  %calltmp = call double @putchard(double 4.200000e+01)
  ; increment
  %nextvar = fadd double %i, 1.000000e+00

  ; termination test
  %cmptmp = fcmp ult double %i, %n
  %booltmp = uitofp i1 %cmptmp to double
  %loopcond = fcmp one double %booltmp, 0.000000e+00
  br i1 %loopcond, label %loop, label %afterloop

afterloop:      ; preds = %loop
  ; loop always returns 0.0
  ret double 0.000000e+00
}
有三个Label, 意味者三个BasicBlock: entry, loop, afterloop.
有四个主要的Expression: Start, Cond, Body, Increment . 当然还有afterloop, 它总是ret 0.0.
IR解析 #
与if/then/else的IR指令相比较, 发现多了一条
\(\bold{uitofp}\)
指令.
| IR指令 | 例子 | 作用 |
|---|---|---|
| \(\bold{fcmp}\) | \(\color{red}{fcmp}\enspace \color{black}{one\enspace double\enspace \%booltmp, 0.0e+00}\) | 比较指令, 相等则返回 0, 不相等返回 1 |
| \(\bold{call}\) | \(\color{red}{call}\enspace \color{black}{double\enspace @ putchard(double\enspace4.2000e+01)}\) | 调用函数 |
| \(\bold{br}\) | \(\color{red}{br}\enspace \color{black}{label\enspace \%loop}\) | 直接跳转 |
| \(\bold{br}\) | \(\color{red}{br}\enspace \color{black}{i1\enspace \%loopcond\enspace label\enspace \%loop, \enspace label\enspace \%afterloop}\) | 条件跳转 |
| \(\bold{phi}\) | \(\color{red}{phi}\enspace \color{black}{double [1.0e+0, \%entry], [\%nextvar, \%loop]}\) | 调用 \(\bold{phi}\) 函数 |
| \(\bold{uitofp}\) | \(\color{red}{uitofp}\enspace \color{black}{i1\ \% cmptmp\enspace to\enspace double}\) | 将bool(1/0)转换为double(1.0/0.0) |
| \(\bold{ret}\) | \(\color{red}{ret}\enspace \color{black}{double\ \% 0}\) | 函数返回 |
| Label | means |
|---|---|
| \(\bold{entry}\) | 函数入口 |
| \(\bold{loop}\) | loop循环入口 |
| \(\bold{afterloop}\) | loop循环结束 |
for’s CFG #
使用opt -analyze -view-cfg loop.bc生成的CFG.

Builder流程图 #
graph TB Start("Loop Codegen") --> StartCodegen["Start->codegen();"] StartCodegen --> builderCreateBr["Builder.CreateBr"] subgraph Loop builderSetInsertLoopBB["Builder.SetInsertPoint(LoopBB)"] builderCreatePHI["Builder.CreatePHI"] BodyCodegen["Body->codegen();"] builderSetInsertLoopBB --> builderCreatePHI builderCreatePHI --> BodyCodegen BodyCodegen --> ifStep{"Step != NULL"} ifStep --Y--> StepCodegen["Step->codegen();"] ifStep --N--> SetStep["Set Step to 1.0"] StepCodegen --> builderCreateFAdd["Builder.CreateFAdd"] SetStep --> builderCreateFAdd builderCreateFAdd --> EndCodegen["End->codegen();"] EndCodegen --> builderCreateFCmp["Builder.CreateFCmpOne"] builderCreateFCmp --> builderCreateCondBr["Builder.CreateCondBr"] end builderCreateBr --> builderSetInsertLoopBB subgraph afterloop builderSetInsertAfterBB["Builder.SetInsertPoint(AfterBB)"] end builderCreateCondBr --> builderSetInsertAfterBB builderSetInsertAfterBB --> End["End Codegen"] style builderSetInsertLoopBB fill:#ffcc66 style builderSetInsertAfterBB fill:#ffcc66 style StartCodegen fill:#ff66cc style BodyCodegen fill:#ff66cc style StepCodegen fill:#ff66cc style EndCodegen fill:#ff66cc style Start fill:#ff9966 style End fill:#ff9966
JIT和优化 #
参考: Adding JIT and Optimizer Support
graph TB subgraph CALL funcall("foo(1);") end subgraph expr nodeExpr("1+2;") end jitAddModule["JIT中 添加此Module"] jitRemoveModule["JIT中 删除此Module"] anoCodegen["执行 匿名函数Codegen"] AnonymousCall["匿名函数包装"] optimizeFunc["执行 Pass优化"] nodeExpr --> AnonymousCall funcall --> AnonymousCall AnonymousCall --> anoCodegen anoCodegen --> jitAddModule jitAddModule --> optimizeFunc optimizeFunc --> exec["jit运行此表达式, 并计算值"] exec --> jitRemoveModule subgraph func definition nodeFoo("def foo(x) x+1;") funcCodegen["执行 函数定义Codegen"] nodeFoo --> funcCodegen end funcCodegen --> jitAddFuncModule["jit中 添加此Module"] jitAddFuncModule --> initPassManager["执行 pass优化"] subgraph extern nodeExtern("extern sin(x);") protoCodegen["执行 函数申明Codegen"] nodeExtern --> protoCodegen end style jitAddModule fill:#f9f style jitRemoveModule fill:#f9f style jitAddFuncModule fill:#f9f style optimizeFunc fill:#ccff66 style initPassManager fill:#ccff66 style exec fill:#ff3300
Driver #
/// top ::= definition | external | expression | ';'
static void MainLoop() {
  while (true) {
    fprintf(stderr, "ready> ");
    switch (CurTok) {
    case tok_eof:
      return;
    case ';': // ignore top-level semicolons.
      getNextToken();
      break;
    case tok_def:
      HandleDefinition();
      break;
    case tok_extern:
      HandleExtern();
      break;
    default:
      HandleTopLevelExpression();
      break;
    }
  }
}